

There’s lots more you can do with Gemini in Google Sheets and the other Workspace apps. See “Google Workspace: 7 great ways to use the Gemini AI sidebar” for detailed instructions and use cases.
Manage multiple sheets in a spreadsheet
Each page of your spreadsheet is represented as a tab along the bottom of the screen. Clicking one of these tabs shows you its corresponding sheet on the screen.
To add a new, blank sheet to your spreadsheet: Click the “+” at the lower-left corner.
To delete or rename a sheet: Click the triangle on the sheet’s tab. From the menu that opens, select Delete or Rename.
To change the order of your sheets: Click-and-hold a sheet’s tab, then drag it left or right to another spot in the row of tabs, and release it.
Use the tab menu to delete, duplicate, copy, rename, or move a sheet.
Howard Wen / Foundry
Select a design theme for your spreadsheet
On the menu bar along the top of the screen, click Format > Theme. A panel will open along the right, showing you several large thumbnails of themes. Scroll through the list and click the thumbnail for the one that you want to use for your spreadsheet. You can apply a theme to a new blank spreadsheet or to one that already has a design.
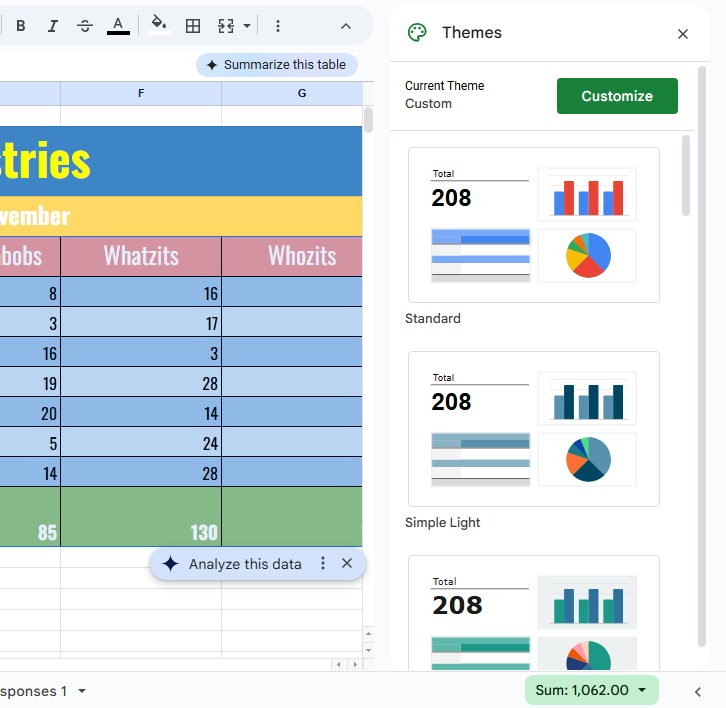
Applying a theme to a spreadsheet.
Howard Wen / Foundry
Get assistance as you enter data
As you’re entering formulas into cells, Google Sheets may make corrections to your formula (if it thinks you’ve made a mistake) or fill in cells with suggested adjustments to your formula.
For example, if you’re entering the same formula cell-by-cell down a column, but changing the formula to correspond with the row number, Sheets may automatically insert your formula into the cells further down the column and apply what it predicts will be your succeeding adjustments to the formula.
This intelligent assistance is on by default, but if you find that it gets in your way, you can turn it off: On the menu bar along the top of the screen, click Tools > Suggestion controls and deselect Enable autocomplete, Enable formula suggestions, and Enable formula corrections. On this menu, you’ll see switches for other categories, such as table and data analysis suggestions, that you can switch off.
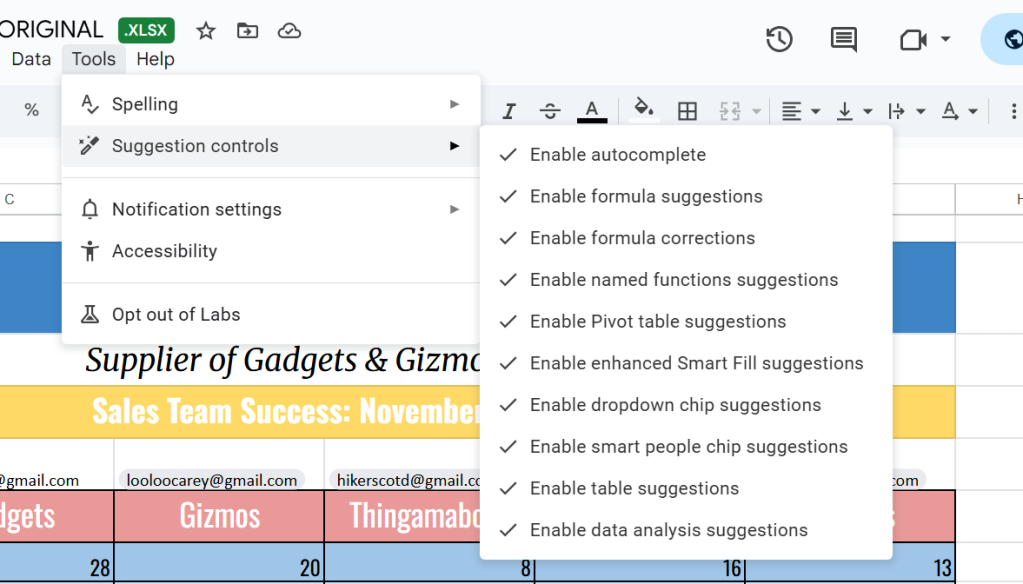
If Sheets’ formula suggestions aren’t working for you, you can disable them.
Howard Wen / Foundry
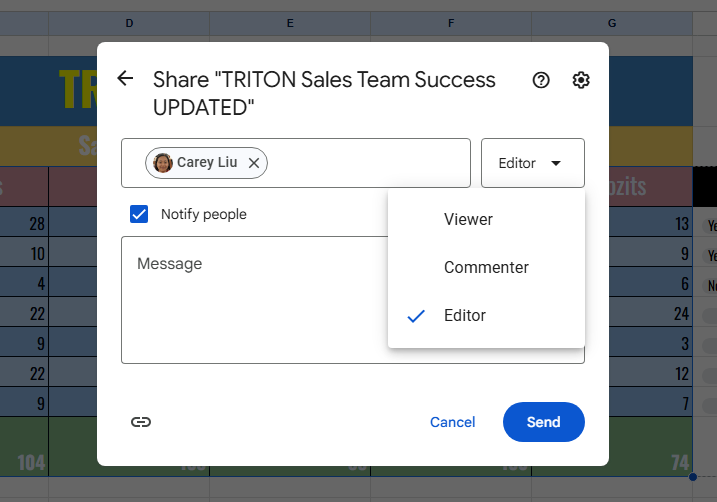
Share your spreadsheet
Through Google Sheets or Google Drive, you can share a spreadsheet for others to view or edit.
From the Google Sheets screen where you’re editing your spreadsheet, click the light blue Share button at the upper right. Or, from the Google Drive home screen, right-click the filename of your spreadsheet and select Share > Share from the menu that opens. Either way, the Share pane opens.
Google lets you share your spreadsheet privately by inviting specific people to access it, or publicly, which means anyone with the link to it can open it. In most cases, business users will want to share their spreadsheets privately with specific colleagues. But there may be a few times when you need to share it publicly, such as when you’re seeking public comments on a spreadsheet.
Setting permissions for a file being shared privately.
Howard Wen / Foundry
Share your spreadsheet privately (only certain people can access it)
On the Share pane, type in the names or email addresses of the people you want to collaborate with on the spreadsheet. You can also type in a brief message to them.
By default, every person you add is given Editor access to your spreadsheet. You can change this by clicking Editor at the right of their name and selecting Commenter or Viewer from the dropdown that opens.
- Editor means they can change your spreadsheet, add comments to it, and reshare it with other people.
- Commenter means they can view your spreadsheet and add comments to it, but they cannot change it.
- Viewer means they can view your spreadsheet, but they cannot change it or add comments to it.
Keep in mind that this setting applies to everyone you’re currently inviting to the spreadsheet.
When you’re done, click Send. Everyone you’ve added will receive an email with a link they can click to access the spreadsheet.
Change, limit, or revoke permissions
You can change anyone’s permissions for a spreadsheet at any time by reopening the Share pane for the spreadsheet. It will list everyone who has access to the spreadsheet. Click the dropdown next to their name to change their permission level or remove their access entirely, then click Save.
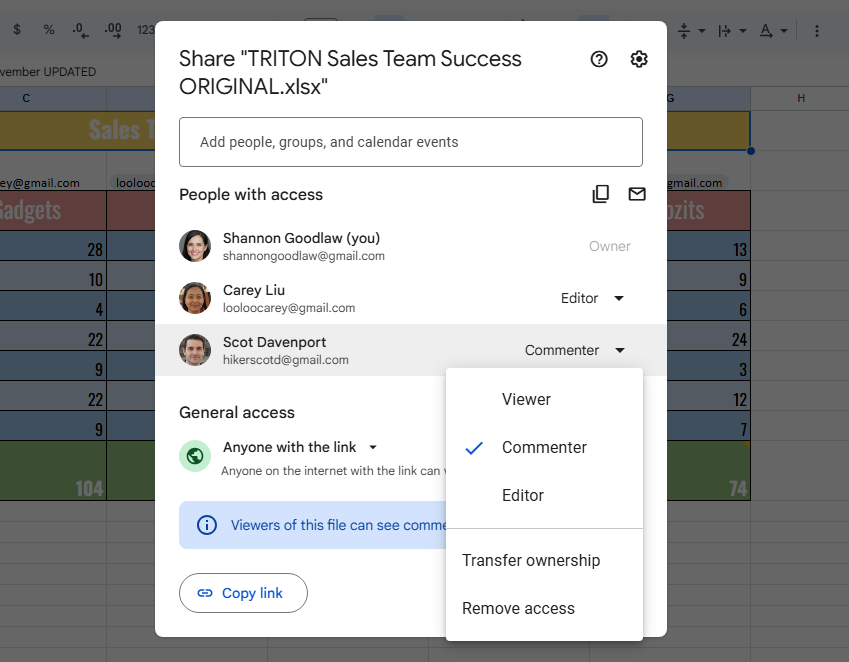
You can change permissions for people you’ve shared a spreadsheet with on an individual basis.
Howard Wen / Foundry
You can also limit the overall permissions for a spreadsheet somewhat by clicking the gear icon in the upper right of the Share pane:
- Uncheck the first checkbox to prevent others at the Editor level from resharing the spreadsheet or changing other collaborators’ permission level.
- Uncheck the second to prevent other Editors from downloading, printing, or copying the spreadsheet. Uncheck the third to do the same for anyone with Viewer or Commenter status.
Set an expiration date
Under a Google Workspace plan, you can also cut off access to a person you’ve shared your spreadsheet with starting on a specified date.
To do this, click the down arrow to the right of a collaborator’s name on the Share pane and select Add expiration. Then, to the right of “Access expires…,” click the pencil icon and select an expiration date (and time if you want) on the pop-up calendar; it can be within one year of the current date. Click Done.
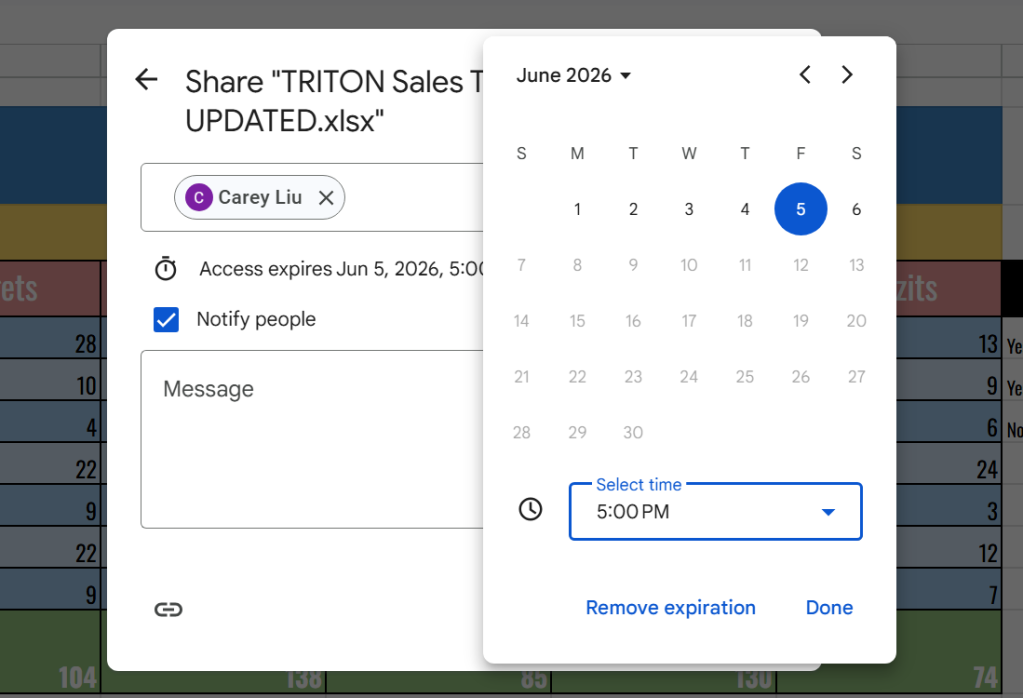
You can set an expiration date for a collaborator’s access to a spreadsheet.
Howard Wen / Foundry
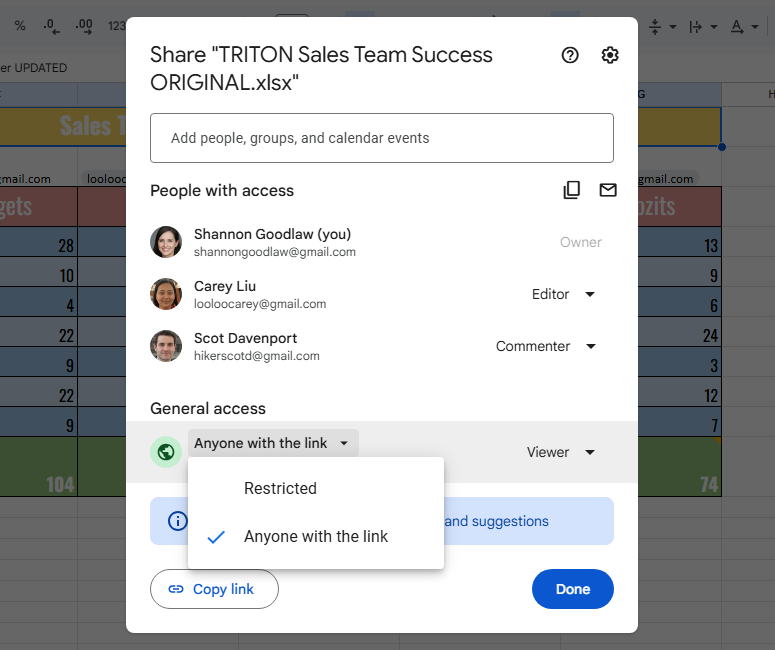
Share your spreadsheet publicly (anyone can access it)
At the bottom of the Share pane is a “Copy link” button that you can click to copy the link to your spreadsheet. By default, this link is restricted to those you invite to the spreadsheet.
To change it to a public link, click Restricted and select Anyone with the link from the dropdown menu.
Generating a public link to a spreadsheet.
Howard Wen / Foundry
By default, this link has Viewer access assigned to it. To allow people to comment on or edit your spreadsheet: Click the Viewer dropdown to the right and then select Commenter or Editor.
After you’ve made your above selections, click the Copy link button. You can now paste this link to your spreadsheet into an email, direct message, or document, or post it on a public forum or social media. Remember that anyone who sees and clicks this link will be able to access your spreadsheet.
To turn off this publicly accessible link to your spreadsheet, reopen the Share pane and click Anyone with the link. From the dropdown that opens, select Restricted. Then click the Done button.
Status of your shared spreadsheets
On your Google Drive or Google Sheets home screen, spreadsheets you’re sharing privately or publicly are marked by an icon of two silhouetted heads. (If you have the home screen of Google Drive set to “Grid layout,” this icon won’t appear with the thumbnail or filename of a shared spreadsheet.)
In file listings, shared spreadsheets show a “shared” icon to the right.
Howard Wen / Foundry
Collaborate on your spreadsheet
The people you’ve shared a spreadsheet with can view or work on it at the same time as you, or at other times. Remember that people who have Editor privileges to your spreadsheet can change all aspects of it.
Having multiple people making changes to a spreadsheet can get confusing and introduce errors. In most cases, setting everyone to Commenter is the best way to collaborate in Sheets. People can attach comments to specific cells, but their comments won’t interfere with your spreadsheet’s data.
To add a comment: Click inside a cell and, on the toolbar above the spreadsheet, click the Insert comment icon (the speech balloon with a + toward the right end of the toolbar — you might have to click the vertical three-dot icon to see it).
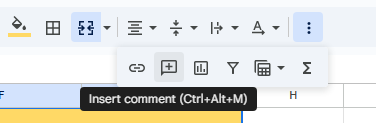
Click this toolbar button to insert a comment.
Howard Wen / Foundry
A blank comment card with your name on it opens by the cell. On this card’s entry line, type a brief comment, and when you’re finished, click the Comment button.

Typing in a new comment.
Howard Wen / Foundry
To draw someone’s attention to a comment: As you’re composing the comment, type the @ symbol and begin typing their name, then select the person from the list of suggested Google contacts that appears. They’ll receive an email notifying them of the comment and linking to it.
To read and reply to a comment: A cell that contains a comment is denoted by a tiny triangle at its upper-right corner. To read it, move the pointer over the cell; the commenter’s name and their comment will appear next to it.
To reply: Click the card or cell. The card will expand to reveal an entry box where you can add a comment in response. Click Reply when you’re done. The comment card will now show the original comment and your reply to it.
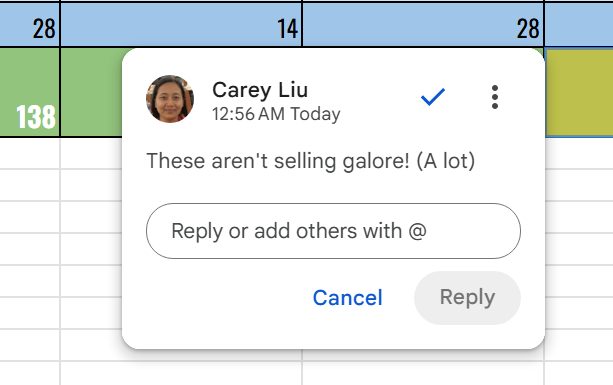
Reading and responding to a comment.
Howard Wen / Foundry
To edit, delete, or resolve a comment: Move the pointer over the cell that has a comment. The comment card will open. Move the pointer over the card.
- Clicking the blue checkmark marks this comment as “resolved” and removes the card from the main spreadsheet.
- Clicking the three-dot icon to the right of the original first comment opens a menu that lets you edit, delete, or get a link to your comment.
- Clicking the three-dot icon to the right of any reply opens a menu that lets you edit or delete the reply.
To see all comments in a spreadsheet: Click the speech balloon icon that’s toward the upper right of the Sheets window (it’s to the left of the Share button). The Comments panel will open along the right of the screen; it lists all the comment cards in your spreadsheet.
When you click a comment card on this list, the view of your spreadsheet in the main window will jump to the cell where the comment is located, and the comment card will be opened. You can reply to the comment from within the Comments panel or the comment card on the spreadsheet.
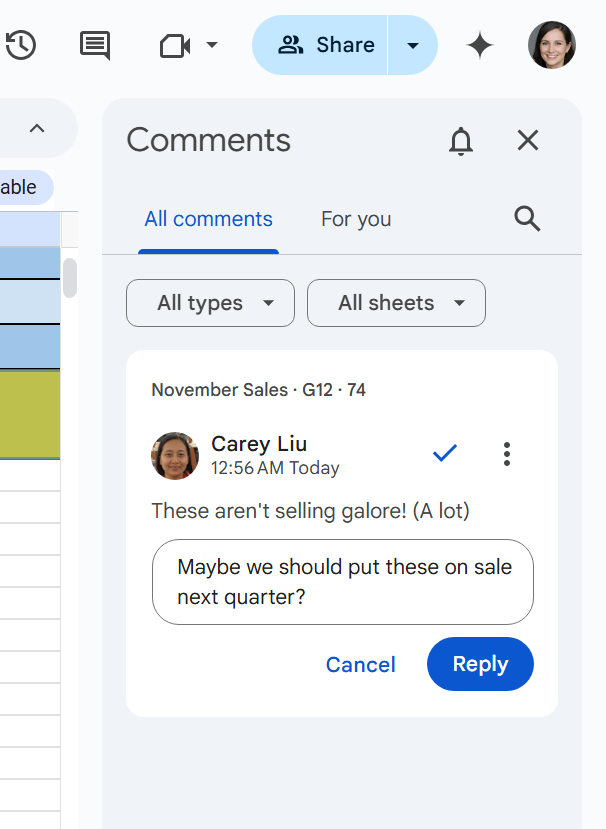
The Comments pane lets you quickly review all comments and jump to specific ones.
Howard Wen / Foundry
Resolved comments appear at the top of the Comments panel. To restore a resolved comment to the spreadsheet, move the pointer over its comment card, click the three-dot icon that appears on it, and select Re-open from the menu.
For more details about collaborating on your spreadsheet, including what it’s like to collaborate in real time, see “How to collaborate on a document” in our Google Drive guide.
Recover older versions of a spreadsheet
Mistakes happen, and you may want to undo changes you or others have made to a spreadsheet. To look up older versions of an open spreadsheet, click File > Version history > See version history. Or, above your spreadsheet, and toward the upper right, click the clock icon.
A panel opens on the right that shows a list of older versions of your spreadsheet, organized by date and time. To see what an earlier version of the spreadsheet looks like, click its date or version name in the list. That version will appear in the main window.
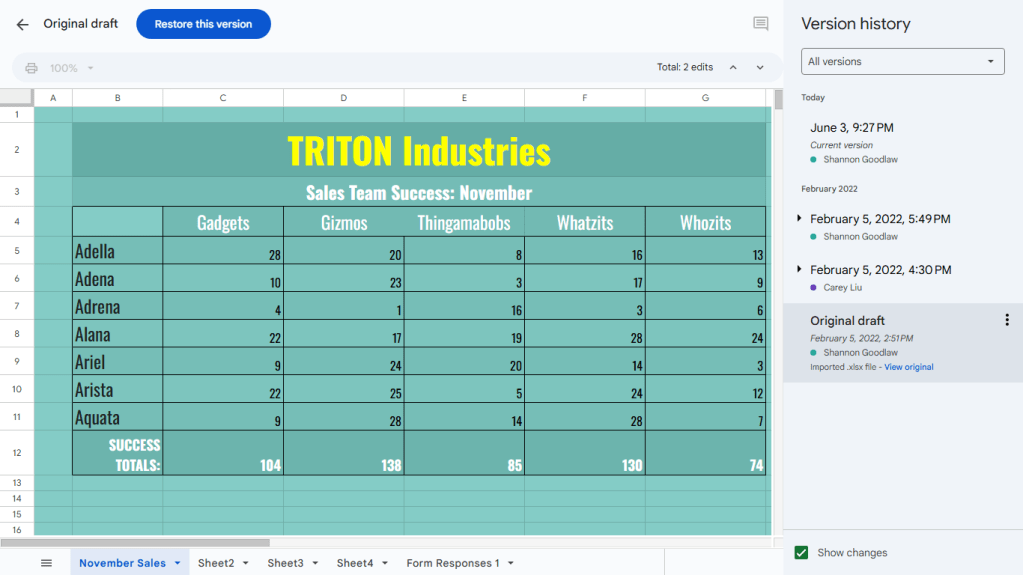
Viewing an earlier version of a spreadsheet with version history.
Howard Wen / Foundry
If you want to use this older version to replace the current version of your spreadsheet, click the blue Restore this version button at the upper-left of the screen. This restored version will then appear at the top of the version history list.
If you want to give an older version a unique name, click its date. You’ll be prompted to type in words to replace the date. The version’s date and time will then appear in smaller type underneath its new name.
Download and export your spreadsheet to Excel or PDF
You can download a spreadsheet and convert it to PDF, .xlsx (if it’s not already an Excel spreadsheet), or another format such as OpenDocument (.ods), Comma Separated Values (.csv), or Tab Separated Values (.tsv).
With the spreadsheet open, select File > Download in the top menu bar and choose a file format. The spreadsheet will be saved to your PC’s storage drive in that format.
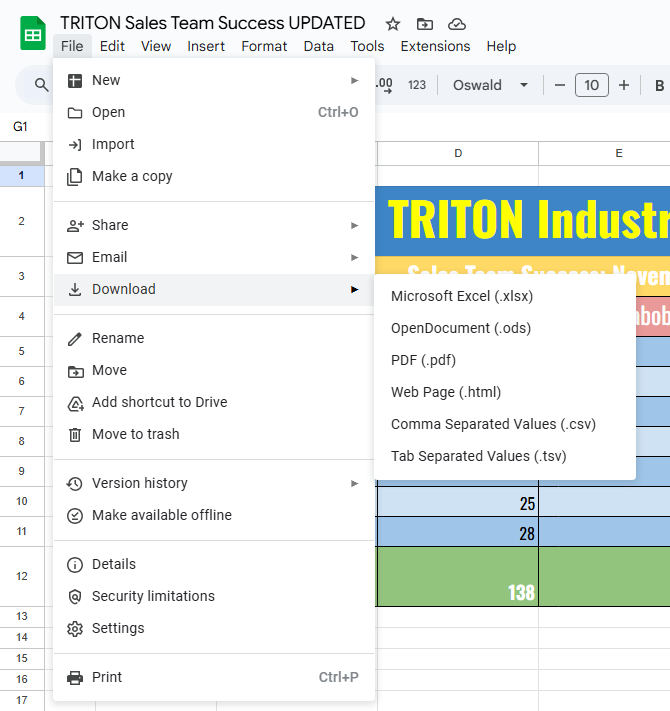
Downloading a spreadsheet.
Howard Wen / Foundry
Alternatively, you can select File > Email and then pick either Email this file or Email collaborators. This action will open a panel that lets you email your document as an attachment. PDF is the default, but you can click the PDF drop-down menu and choose Excel or Open Office Spreadsheet.
Use the Google Sheets mobile app
With the exception of the Version history tool, the Google Sheets app (available for Android, iPhone and iPad) has many of the same features described in this guide. You probably won’t want to do any heavy spreadsheet editing on a phone screen, but the mobile app is handy for making quick edits, as well as sharing and commenting on sheets.
Toolbars along the top and bottom of the screen let you add comments and new sheets to your spreadsheet. Tapping a cell brings up top and bottom toolbars. The selections on these toolbars let you add columns or rows next to the cell, or edit the formula or text inside it.
Tap the three-dot icon at the right end of the top toolbar to use the “Data validation” tool or to create named ranges, share your spreadsheet (see our Google Drive guide for instructions on sharing from the mobile app), or export it to another file format.
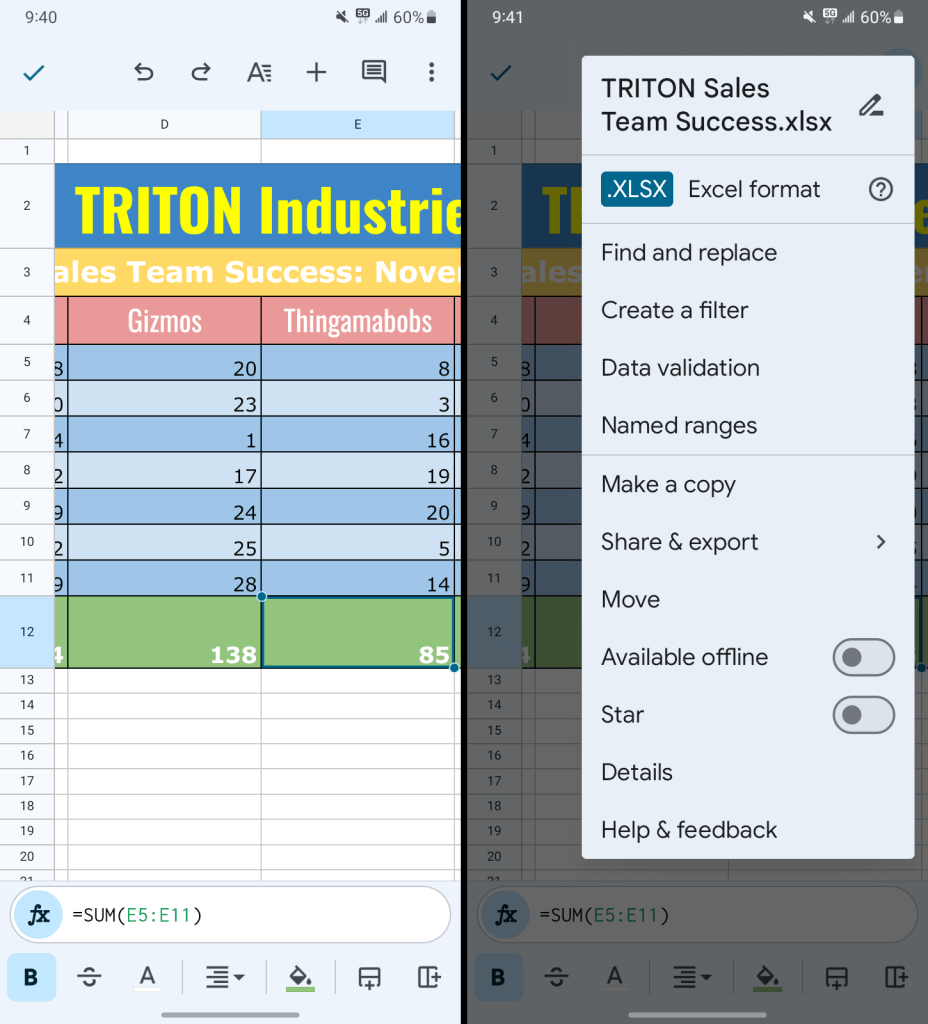
Two views of the Google Sheets Android app.
Howard Wen / Foundry
Use keyboard shortcuts
Save time in Sheets by using keyboard shortcuts for common tasks. Below are some of the most useful to know. For more, select Help > Keyboard shortcuts from the top menu when you have a spreadsheet open or press Ctrl + / (Windows, Chrome OS) or ⌘ + / (macOS).
Handy Google Sheets keyboard shortcuts
| BASICS | ||
| Action | Chrome OS and Windows shortcut |
macOS shortcut |
| Select column | Ctrl + Space | Control + Space |
| Select row | Shift + Space | Shift + Space |
| Select all | Ctrl + A | ⌘ + A |
| Copy | Ctrl + C | ⌘ + C |
| Paste | Ctrl + V | ⌘ + V |
| Undo | Ctrl + Z | ⌘ + Z |
| Redo | Ctrl + Y | ⌘ + Y |
| Find | Ctrl + F | ⌘ + F |
| Find and replace | Ctrl + H | ⌘ + Shift + H |
| Fill down | Ctrl + D | ⌘ + D |
| Fill right | Ctrl + R | ⌘ + R |
| Fill range | Ctrl + Enter | ⌘ + Enter |
| Insert comment | Ctrl + Alt + M | ⌘ + Option + M |
| Insert rows above selection or columns to the left of selection | Ctrl + Alt + = | ⌘ + Option + Shift + = |
| Delete selected rows or columns | Ctrl + Alt + – | ⌘ + Option + – |
| USING FORMULAS | ||
| Action | Chrome OS and Windows shortcut |
macOS shortcut |
| Show all formulas in spreadsheet | Ctrl + ~ | Control + ~ |
| Insert array formula | Ctrl + Shift + Enter | ⌘ + Shift + Enter |
Ready to take Sheets to the next level? Check out “6 quick tips for Google Sheets.”
This article was originally published in August 2019 and most recently updated in August 2025.